
dormakaba Ambiance server migration guide
Updated 10 October 2026
Field guide · Windows server migration · Checked 10 October 2026
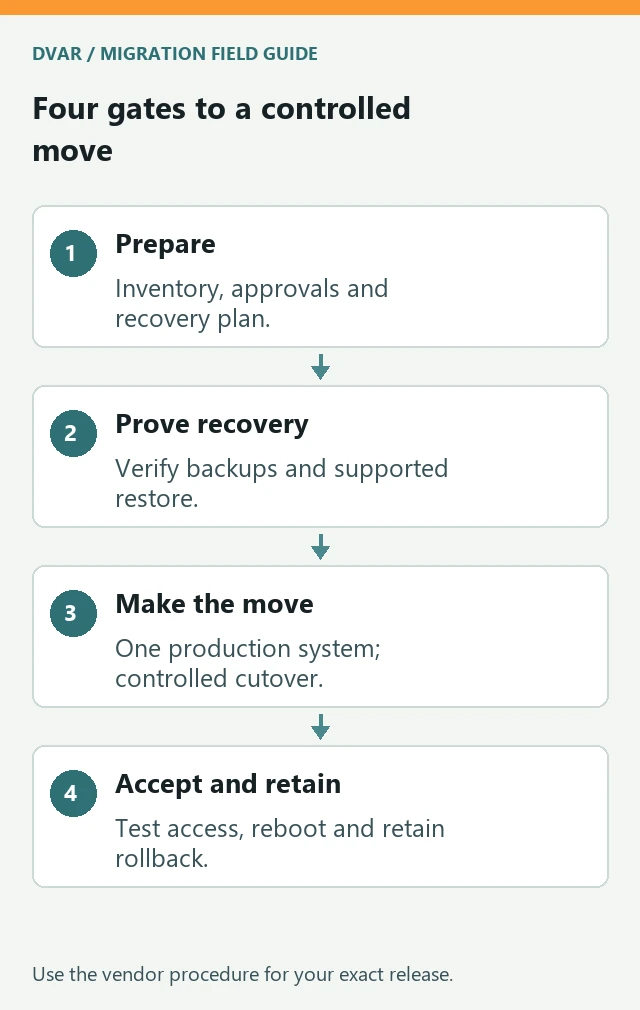
Migrate your dormakaba Ambiance server without losing sight of what matters: authorised key issuance, working locks and a recoverable property system. This checklist takes you from preparation through installation, controlled cutover and final acceptance.

Before you begin
For authorised property IT teams and installers. This is an independent operational guide, not official dormakaba documentation. Use the installation and recovery procedure for your exact release and confirm the supported version path, security material and licence transfer with the vendor.
The public dormakaba recovery and service references linked here are labelled Ambiance 2.13. They provide useful context, not a compatibility promise for another version. No fixed downtime estimate is given: rehearsal, database size, enabled features and physical tests determine the maintenance window.
Success is operational: restored property data, authorised card issuance, physical lock acceptance, working integrations and a healthy restart. A completed installer is only one checkpoint.
Jump to a stage
Plan and protect
- 1. Plan the migration
- 2. Record the existing configuration
- 3. Obtain and verify the installer
- 4. Create a recoverable backup set
Prepare and install
- 5. Prepare the replacement computer
- 6. Diagnose an incomplete installation
- 7. Run the installer as an administrator
- 8. Choose installation settings
Diagnose and restore
- 9. Check services and the web application
- 10. Resolve port conflicts
- 11. Transfer the licence and restore the property
Test and hand over
- 12. Reconnect clients and integrations
- 13. Test restart and recovery
- 14. Complete cutover and handover
- 15. Troubleshooting checklist
Example commands: SOURCE-SERVER and TARGET-SERVER mean the old and replacement machines. All paths and identifiers below are generic. Review each command separately on the intended machine; do not run the page as a script. Protect real credentials, key material and recovery records.
1. Plan the migration
- Identify the person responsible for authorising downtime and the technician responsible for recovery. Arrange an on-site contact for encoder, card and physical lock tests.
- Agree the maintenance window, the point at which production issuance will pause, the acceptance criteria and the rollback decision time.
- Confirm the supported source-to-target version path with dormakaba. Do not assume an older application can restore a newer database or that installing the newest release is the correct migration path.
- Keep the existing server available during preparation. Do not rename it, reset property security keys, erase it or decommission it before acceptance.
- Plan to have only one active production system controlling the property at cutover. Avoid concurrent writes and duplicate integrations.
- Use approved remote access and existing authorised administrator accounts. A remote shell running as SYSTEM does not automatically have SQL administrator permissions.
Stop before disruptive work: obtain the system owner’s approval for installer termination, service interruption, database restore, restarts and production cutover. Document the expected effect on any other applications sharing the computer.
2. Record the existing configuration
Application version and edition
Determines installer and restore compatibility.
Windows and database versions
Must meet the exact release requirements.
Server hostname and network addressing
Clients and integrations must resolve the intended destination.
Installed services and startup modes
Provides a baseline for post-installation and restart checks.
Website bindings, certificates and API endpoints
Helps identify certificate, routing and port conflicts.
Licensed modules and property identity
Must be retained through the approved transfer process.
Encoder and lock configuration
Required for controlled physical acceptance tests.
PMS and other integrations
Identifies the actual provider, protocol and endpoints to migrate.
Backup schedule and recovery material
Establishes what must be preserved and how to recover.
Keep this inventory private. Do not expose real hostnames, IP addresses, customer references, account names, passwords, activation keys, client tokens, backup contents or hardware identifiers in public handovers. Redact screenshots before sharing them.
Read-only PowerShell checks
# Read-only checks on the computer being inspected
hostname
whoami
Get-Date
Get-CimInstance Win32_OperatingSystem |
  Select-Object Caption,Version,BuildNumber
Expected result: you can positively identify the source and target, the installed release and the dependencies. Do not make changes when the computer identity is uncertain.
3. Obtain and verify the installer
- Obtain the full server installation package and matching guides from dormakaba, an authorised installer or a verified internal software archive.
- Confirm the package is appropriate for the source version and the approved migration path. Avoid unofficial download sites.
- Preserve the complete folder structure. A server executable may depend on prerequisite files located beside it; copying only the executable can break installation.
- Verify the package checksum against a trusted vendor or internal reference, if available. A checksum calculated from an untrusted download does not establish authenticity.
- Check the executable’s digital signature and product version. Investigate unexpected publisher, version or signature results before execution.
- Copy the verified package to local storage on the target and extract it fully. Use a new empty extraction folder to avoid mixing releases.
Read-only PowerShell checks
# Example paths only — replace with the verified package location
$archive = 'C:\Migration\AmbianceServerPackage.zip'
Get-FileHash -LiteralPath $archive -Algorithm SHA256
$installer = 'C:\Migration\Media\SERVER\Ambiance_Server.exe'
(Get-Item -LiteralPath $installer).VersionInfo |
  Select-Object ProductVersion,FileVersion
Get-AuthenticodeSignature -LiteralPath $installer |
  Select-Object Status,StatusMessage,SignerCertificate
For a reusable installer USB, keep the full package, exact-release guides, a checksum manifest and this guide together. Verify the copied files and actual drive letter. Keep licence records, property backups and security material in separate protected storage. Do not reformat a drive without checking its contents and obtaining approval.
Reference: file-hash verification and digital-signature inspection.
4. Create a recoverable backup set
- Identify the vendor-supported backup process for the installed release. Determine which SQL databases, security or GDPR recovery material, configuration and other data stores must be included.
- Confirm whether MongoDB, Online Communication or other enabled features require additional recovery steps. Do not assume a SQL backup covers every component.
- Create a preparation backup and agree how the final consistent cutover backup will be taken after issuance and relevant integrations are paused.
- Copy the selected backup set into dated, access-restricted storage and retain an independent protected recovery copy. Preserve the source files.
- Compare source and destination hashes to verify copying. Record the snapshot timestamp and its matching recovery material privately.
- Have an existing authorised SQL administrator validate the selected SQL backup. Use the vendor procedure to validate any other required backup components.
HEADERONLY lists the backup sets; FILELISTONLY and VERIFYONLY default to the first set. If the media contains multiple sets, ask the database administrator to select the intended set explicitly. The path is resolved by SQL Server, and the database service must be able to read it.
SQL backup inspection
-- Read-only backup inspection in an authorised SQL query session.
-- Replace the example path with the intended snapshot.
RESTORE HEADERONLY
  FROM DISK = N'C:\Migration\Backup\PropertyDatabase.bak';
RESTORE FILELISTONLY
  FROM DISK = N'C:\Migration\Backup\PropertyDatabase.bak';
RESTORE VERIFYONLY
  FROM DISK = N'C:\Migration\Backup\PropertyDatabase.bak';
Expected result: readable metadata for the intended database and successful verification without errors. These statements do not restore the database. Hash equality proves copy consistency; VERIFYONLY does not prove application compatibility, security-key recovery or operational readiness.
If verification is denied, use an appropriately authorised SQL account or involve the database administrator. Do not grant broad SQL privileges to a remote-management account as a shortcut. Do not copy live database files as a replacement for supported backups.
Vendor context: Ambiance 2.13 recovery guidance identifies SQL backup and security recovery material, with MongoDB recovery for Online Communication. Confirm the matching set for your release. Microsoft’s VERIFYONLY documentation explains why a readable backup is not proof of a successful application recovery.
5. Prepare the replacement computer
- Confirm that the target’s Windows version, hardware, storage and database prerequisites are supported by the selected Ambiance release.
- Choose the target hostname and a stable addressing or DNS plan before configuring clients. Do not duplicate the production server’s identity while both computers are connected.
- Install approved operating-system updates and complete any required restart during the agreed window.
- Inventory other applications, especially web servers and CCTV software, that may compete for ports or resources.
- Prepare an authorised interactive administrator session. Verify remote-access recovery after restart and keep an on-site fallback available.
- Confirm sufficient free space for installation, extraction, restored data, temporary restore operations and ongoing backups.
Use the installation guide’s firewall and certificate requirements. Do not broadly disable security controls, open public access or expose the application directly to the internet to solve a local installation issue.
6. Diagnose an incomplete installation
Before interrupting an apparently stalled installer, distinguish a slow prerequisite update from a failed installation. A database update can remain busy without obvious changes to the main wizard.
- Record the installer message, current time and any error dialog. Inspect running processes and recent installer or Application logs.
- Identify the executable path and owner of the actual installer. Determine whether a prerequisite is still making progress.
- Check installed products and services. A working server should not be reinstalled simply because an earlier attempt failed.
- If the installer has failed, obtain approval to close that specific instance. Prefer the normal Cancel or Close action.
- Use force termination only as an approved last resort after checking the current process identity and dependency activity. Never kill all setup, msiexec or SQL processes.
- If the installer or operating system requires a restart, arrange it explicitly before retrying.
Read-only PowerShell checks
# Read-only process inspection
Get-CimInstance Win32_Process |
  Where-Object { $_.Name -match 'Ambiance_Server|setup|msiexec' } |
  ForEach-Object {
    $owner = Invoke-CimMethod -InputObject $_ -MethodName GetOwner
    [pscustomobject]@{
      PID = $_.ProcessId
      Name = $_.Name
      Path = $_.ExecutablePath
      Owner = ($owner.Domain + '\' + $owner.User)
    }
  } | Format-List
Use the installed-apps view or uninstall registry for product inventory. Avoid using Win32_Product for routine discovery because it can trigger installer consistency checks. Inspect logs privately; redact them before publication.
Microsoft documents the installer consistency checks triggered by Win32_Product.
7. Run the installer as an administrator
Correct elevation and the correct working directory are separate requirements. Launching an installer with administrator rights does not guarantee it can find prerequisite files referenced through relative paths.
- Locate the verified server installer in the fully extracted package. Confirm its neighbouring prerequisite folders are present.
- Open PowerShell in the interactive target desktop and use the launch pattern below.
- Complete UAC with an existing authorised administrator account. Do not embed credentials in the command.
- Verify the installer’s process owner and the intended machine-wide installation destination before continuing.
- Allow prerequisites to complete. If a provider installation fails, inspect its specific log rather than repeatedly retrying the entire wizard.
Installer launch — changes the target
# Starts an installer and may change the target computer.
# Review the path and obtain installation approval first.
$serverDir = 'C:\Migration\Media\SERVER'
Set-Location -LiteralPath $serverDir
Start-Process -FilePath (Join-Path $serverDir 'Ambiance_Server.exe') `
  -WorkingDirectory $serverDir -Verb RunAs
Expected result: the installer runs with the required elevation from the correct package directory. If the wizard unexpectedly offers a per-user destination or cannot find prerequisite files, stop and review the launch context.
Command reference: Start-Process supports separate elevation and working-directory options.
8. Choose installation settings
- Follow the exact-release installation guide and have the authorised person accept the vendor licence terms.
- Choose the correct server components and installation destination. Record the actual choices for internal recovery documentation.
- Select the target server identity. Do not select the source computer by mistake.
- Use the supported new or existing database-instance option for your environment. Do not point the replacement installer at production databases unless the vendor explicitly requires that architecture.
- Configure certificates and website access using the approved design. For HTTPS, use a valid certificate with the correct identity and required trust configuration.
- Allow bundled dependency installation and updates to finish. Do not terminate an active database update merely because it is taking time.
- Finish only after the wizard reports success. Record any requested restart and complete it in the approved window.
Do not assume that selecting HTTP for a website removes all HTTPS dependencies. The API or another component may have separate bindings. Conversely, do not copy a port list from another release without inspecting the current configuration.
9. Check services and the web application
- Verify the installed application version and relevant database instance. Compare them with the approved plan.
- Inspect required services, startup modes and event logs. Assess optional services against the features actually in use.
- If the deployment uses IIS, inspect the site state and bindings. Check separate API services as well.
- Open the configured application URL in a real browser and inspect the complete rendered page. HTTP 200 alone does not prove that API calls or login work.
- For a fresh unactivated installation, an activation page can be expected. After migration, verify that the intended property and restored data are available.
- If the page fails, correlate the browser error with service events, certificate state and current port ownership before changing configuration.
Read-only PowerShell checks
# Read-only service inventory — adjust names to the installed release
Get-CimInstance Win32_Service |
  Where-Object {
    $_.DisplayName -match 'Ambiance|MongoDB|RabbitMQ|Redis' -or
    $_.Name -in @('W3SVC','WAS')
  } | Select-Object Name,DisplayName,State,StartMode

# Common web ports only; inspect other configured ports as required
Get-NetTCPConnection -State Listen -ErrorAction SilentlyContinue |
  Where-Object { $_.LocalPort -in @(80,443) } |
  Select-Object LocalAddress,LocalPort,OwningProcess
Some dependencies legitimately use Manual or trigger-based startup. Do not change every service to Automatic. Do not create an IIS API application merely because a URL returns 404; first establish how that release hosts the API.
Use the vendor’s service reference as release-labelled context, then compare with the actual installed configuration. Microsoft documents listener and owning-process inspection.
10. Resolve port conflicts
Other applications, including CCTV software using nginx, can compete for web ports. Treat this as a diagnosis to confirm, not a reason to disable any service with a familiar name.
- Read the failed service’s events. A bind or URL-prefix registration error can indicate a listener or registration conflict.
- Use listener inspection to find the owning PID, then inspect that process’s executable path and related service.
- Check both IPv4 and IPv6 listeners and the ports actually configured for the application.
- Agree which service owns each required port. Prefer a vendor-supported coexistence design or separate host when both applications are needed.
- If stopping the competing service is approved, stop only that verified service through its normal control mechanism.
- Recheck workers and listeners. Some service wrappers can stop while child processes remain. Use the competing product’s documented graceful shutdown before considering approved selective termination.
- Start the intended Ambiance component, inspect its state and test the real browser page.
- Make the agreed solution persistent through supported startup or binding configuration, then test after restart. A one-time stop is not a permanent fix.
Read-only PowerShell checks
# Inspect a current listener's PID; replace 1234 with the observed value
$listenerPid = 1234
Get-CimInstance Win32_Process -Filter "ProcessId=$listenerPid" |
  Select-Object ProcessId,ParentProcessId,Name,ExecutablePath
Get-CimInstance Win32_Service |
  Where-Object { $_.ProcessId -eq $listenerPid } |
  Select-Object Name,DisplayName,State,StartMode,PathName
An empty service match can mean the listener is a child process or is not hosted as a Windows service. Investigate its parent chain. Never use old PIDs from a previous session or terminate every nginx process on the computer.
11. Transfer the licence and restore the property
Distinguish the recovery artifacts
Server activation or licence record
Enables licensed server features under the vendor’s entitlement and transfer rules.
Client token and server URL configuration
Associate a client installation with its intended server; they are not interchangeable with a server activation key.
Database backup
Contains database state for a selected recovery point.
Security or GDPR recovery material
Required by the applicable recovery process to preserve access to protected data and property security state.
File names, token formats and activation-key lengths can vary by release. Determine the artifact’s purpose from the exact-release documentation, not its name or character count alone. Do not publish or try unrelated tokens in activation fields.
Confirm the restore sequence before proceeding
- Ask dormakaba or the authorised installer to confirm licence transfer eligibility and whether activation occurs before or after restoration.
- Obtain the exact restore procedure for the source and target versions, including required service stops, database-instance mapping and security-key handling.
- Determine whether other data stores and machine-specific settings must be restored or reconfigured.
- Confirm whether the source licence must be released and at what point. Do not deactivate production prematurely.
- At the approved cutover boundary, pause issuance and integrations according to the agreed plan, take the final consistent backup and validate the selected recovery set.
- Follow the documented restore and activation order. Supply security material only through the supported workflow; do not create new property keys as a workaround.
- Reconfigure machine-specific values through supported tools. Do not blindly copy encrypted configuration between machines.
- Start services in the documented order, inspect logs and compare the restored property identity, representative records, room/lock configuration and licensed features with the source baseline.
Stop gate: do not improvise a database overwrite when the official restore procedure, matching recovery material or licence-transfer order is missing. This guide intentionally does not provide a universal RESTORE DATABASE command: file mappings, database dependencies and application security requirements must be established for the actual system.
Expected result: the existing property is restored with its original security configuration and required entitlements. A database marked ONLINE is necessary but does not prove a complete migration.
Recovery reference: dormakaba’s release-labelled recovery procedure. Do not transplant its overwrite or address-change steps into a different deployment without confirming the supported sequence.
12. Reconnect clients and integrations
- Generate or obtain the client package intended for the restored target server. Keep its installer, server configuration and token files together as required by the vendor.
- Reconfigure or reinstall each approved client using the supported procedure. Verify the intended destination and authorised login.
- Do not add a standalone client to the server merely to fix activation; follow the release’s supported server/client deployment model.
- Connect the authorised encoder using its supported method. Preserve the existing property security configuration and avoid simultaneous ownership by two production servers.
- Use an authorised test card and designated test room or lock. Test card writing, reading and actual physical lock acceptance.
- Check existing valid-card compatibility and the required staff or emergency workflows using controlled test procedures.
- Identify the actual PMS and other integrations. Migrate their real endpoints and protocols; do not assume an old commissioning note is still current.
- Run agreed end-to-end integration transactions and verify results in both systems. Record pass evidence privately.
Do not reset encoders, initialise operational locks or generate uncontrolled master keys as troubleshooting shortcuts. A successful card read alone does not demonstrate that newly issued cards will work at the door.
13. Test restart and recovery
- Schedule an approved target restart after all installation and restore operations have finished. Confirm an on-site contact and remote-access recovery route.
- Record the healthy pre-restart state, then use a normal operating-system restart.
- After startup, verify identity, network addressing, required services, web/API availability and absence of port conflicts.
- Repeat a representative client login, encoder/physical lock test and critical integration transaction.
- Confirm the scheduled backup produces a new recovery set in the intended protected location.
- Verify the new backup and separately confirm that the off-machine copy exists and is usable under the agreed recovery process.
Expected result: the system returns to the accepted operational state without manual repair. A configured Automatic startup mode or a local backup-success message is not a substitute for testing the resulting behaviour.
14. Complete cutover and handover
Correct property and release
Expected identity, compatible versions and representative restored records.
Licensing and security
Required features active and original security configuration retained.
Clients and web application
Successful authorised sessions against the target.
Physical access workflow
Controlled card issuance and physical lock tests passed.
Integrations
Required end-to-end flows passed; unused features explicitly marked not applicable.
Restart persistence
Approved restart completed with healthy services and no recurring conflict.
Recovery
Fresh validated backup and protected independent recovery copy.
Operational ownership
One production system, named support owner and approved rollback plan.
- Obtain the property owner’s sign-off against the acceptance criteria before declaring completion.
- Retain the source for the agreed rollback period, protected from unintended production use.
- If the target has accepted new production transactions, do not blindly switch back to a stale source. Pause activity and reconcile data and licence state with vendor support.
- Remove temporary transfer accounts, shares and unnecessary access after the authorised retention period. Check dependencies before cleanup.
- Store private recovery records securely. Keep the generic installer archive separate from customer data and secrets.
- Document any displaced application and its approved coexistence plan. Recheck service ownership after future updates.
- Decommission the source only after explicit approval and confirmation that the retained recovery material meets the organisation’s requirements.
15. Troubleshooting checklist
Missing database provider or prerequisite failure
Check first: Elevation, prerequisite logs and working directory
Next action: Repair the specific supported prerequisite or relaunch correctly after diagnosis.
Installer appears stuck
Check first: Active prerequisite work and recent logs
Next action: Wait for progressing work; interrupt only a confirmed failed instance with approval.
Certificate selection fails
Check first: Certificate identity, validity, trust and required store
Next action: Provide a valid certificate using the documented configuration.
Page loads but login or API fails
Check first: Rendered error, API service and event logs
Next action: Diagnose the component failure; do not rely on HTTP status alone.
Service exits on startup
Check first: Binding errors, dependencies and port ownership
Next action: Resolve the confirmed cause with the affected application owners.
Port remains busy after service stop
Check first: Surviving worker process and its exact path
Next action: Use documented graceful shutdown; escalate selective termination only if approved.
Failure returns after reboot
Check first: Startup configuration, scheduled tasks and competing processes
Next action: Implement and verify a persistent supported solution.
Backup verification denied
Check first: Actual SQL execution identity and permissions
Next action: Use an existing authorised database administrator.
Activation rejected
Check first: Correct licence artifact and transfer eligibility
Next action: Contact the vendor; do not substitute a client token.
Database restores but operation fails
Check first: Security material, version, other data stores and integrations
Next action: Follow the complete application recovery procedure and acceptance tests.
Keep actual settings, vendor case references, test results and recovery locations in a separate protected handover. Review the procedure against the exact vendor release before every migration.
Discuss your engineering project
Planning a wider systems-integration or verification project? Contact DVAR with your scope and acceptance criteria. For Ambiance licensing, supported recovery and product-specific faults, use dormakaba or your authorised installer.
References and release notes
- dormakaba: disaster preparedness and recovery (public help labelled Ambiance 2.13)
- dormakaba: Ambiance services (2.13 reference; confirm your release)
- Microsoft: RESTORE VERIFYONLY and its limitations
- Microsoft: Start-Process, elevation and working directory
- Microsoft: Get-NetTCPConnection
- Microsoft: Get-FileHash
- Microsoft: Get-AuthenticodeSignature
- Microsoft: why Win32_Product queries can trigger installer checks